

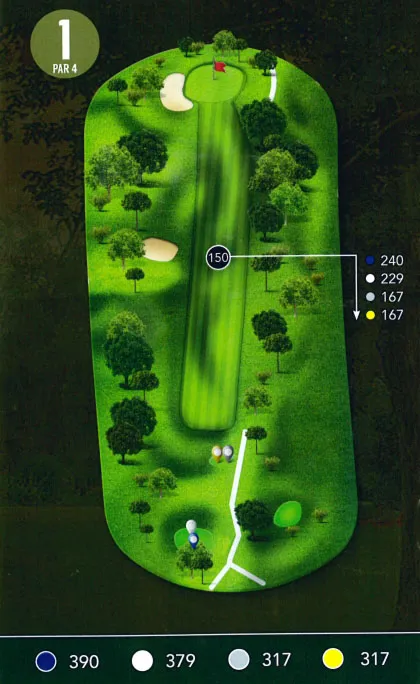

Pro Tip: A straight-away par 4 with a bunker on the left side of the fairway that is not visible off the tee. Favor the left-center of the fairway as the right rough is tree lined and cuts off your view of the green.
| Blue | 390 |
| White | 379 |
| Silver | 317 |
| Yellow | 317 |
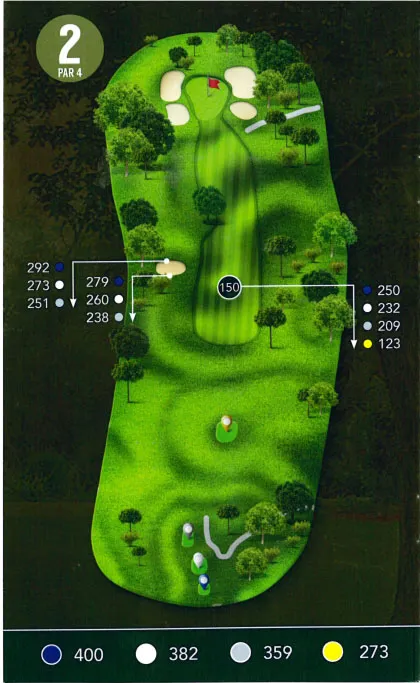
Pro Tip: A long par 4 with a large tree that guards any shot from the left side of the hole. Place your tee shot on the right side of the fairway to avoid the bunker looming off the left side of the fairway to give yourself the best look at this heavily protected green.
| Blue | 400 |
| White | 382 |
| Silver | 359 |
| Yellow | 273 |
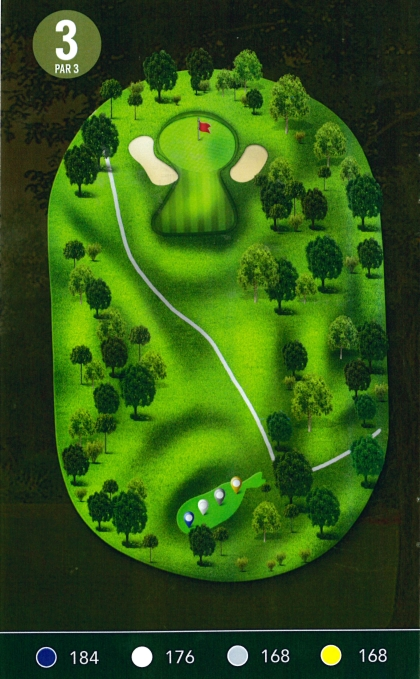
Pro Tip: Consider clubbing down on this downhill par 3. Two large bunkers protect the tough green on both sides. When approaching the green, keep the ball below the hole or you will be faced with a severe downhill putt with a lot of break.
| Blue | 184 |
| White | 176 |
| Silver | 168 |
| Yellow | 168 |
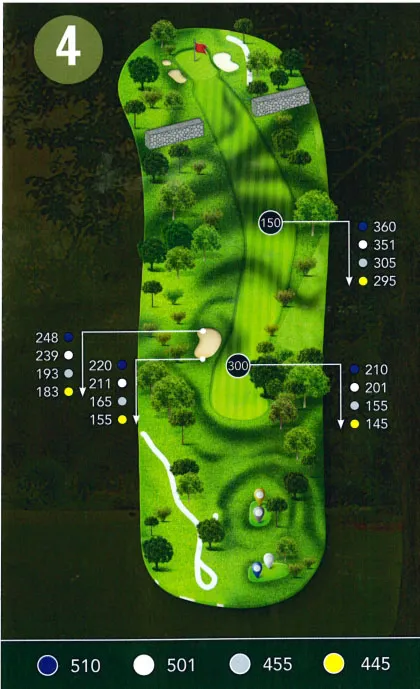
Pro Tip: The ideal play off the tee is a left to right shot that avoids the out-of-bounds right of the fairway on this deceiving par 5. The lay-up shot ideally leaves around 100 yards. A large rock wall comes into play if you go much further than that and can send a golf ball in any direction.
| Blue | 510 |
| White | 501 |
| Silver | 455 |
| Yellow | 445 |
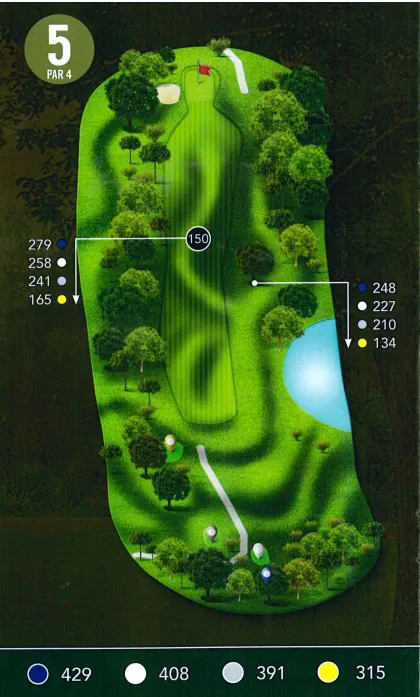
Pro Tip: One of the toughest driving holes on the golf course, this demanding par 4 requires an accurate tee shot to avoid the penalty area and out-of-bounds on the right. Placing your tee shot below the crest of the hill will lead to a blind second shot. The large tree behind the hole can be used as a good reference point for the green. Although it appears to slope towards you, the green actually slopes front-to-back so be sure to land the ball well short of the hole.
| Blue | 429 |
| White | 408 |
| Silver | 391 |
| Yellow | 315 |
Pro Tip: Avoid the water on the right and you will be rewarded on this long par 5. Although it is difficult to reach in 2, it is possible with a drive that clears the right edge of the trees left of the fairway. When laying up, though, favor the left side of the fairway for the clearest approach shot. The green is also well protected by trees and bunkers on each side.
| Blue | 529 |
| White | 508 |
| Silver | 500 |
| Yellow | 403 |
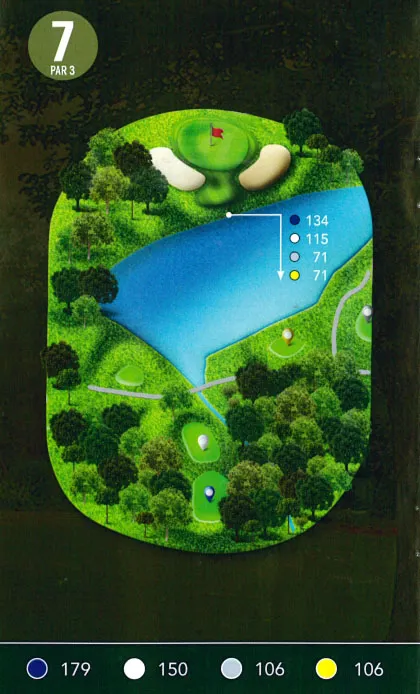
Pro Tip: The signature hole at Old Hickory, this par 3 can be visually appealing, but also threatening. Place your shot carefully as the green slopes severely back-to-front. Walking away with par is a very good score.
| Blue | 179 |
| White | 150 |
| Silver | 106 |
| Yellow | 106 |
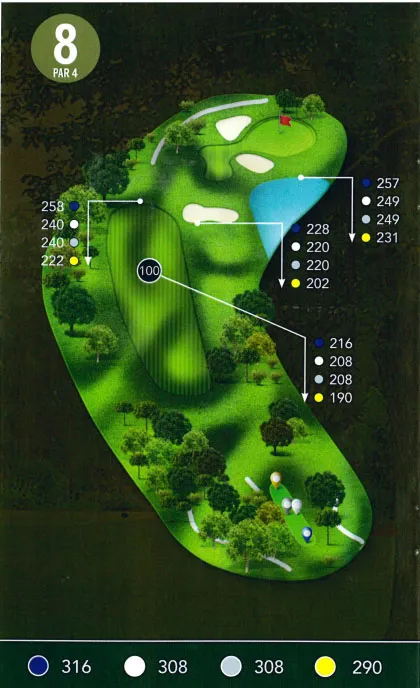
Pro Tip: A high risk-high reward hole, the par 4 8th presents an opportunity to reach the green off the tee. Although it will take some creativity, it can reward you greatly to be near the green after the tee shot. Water protects the right side of the fairway and green. Bunkers surround the green which slopes drastically toward the pond.
| Blue | 316 |
| White | 308 |
| Silver | 308 |
| Yellow | 290 |
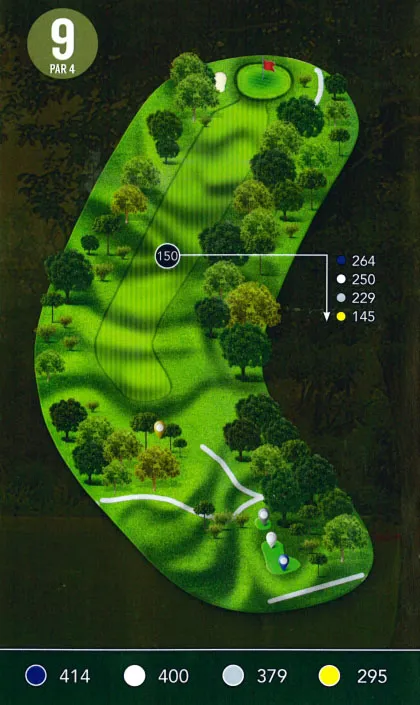
Pro Tip: With yet another tough tee shot, this hole requires an accurate tee shot to leave an opportunity to hit the elevated green. Hug the right tree line off the tee and club up on the second shot. The tightly mowed face of the hill can leave you with a very difficult pitch up to the green if you don’t reach the top.
| Blue | 414 |
| White | 400 |
| Silver | 379 |
| Yellow | 295 |
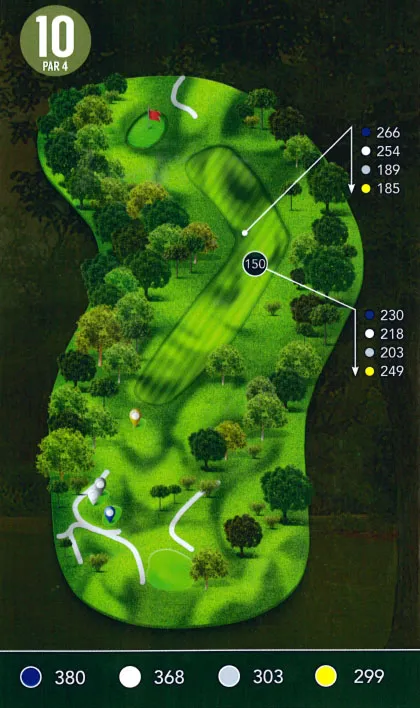
Pro Tip: Place your tee shot near the top of the hill on this dogleg left par 4. Favor the right side as the trees will block any tee shot resting left of the fairway. Another elevated green demands attention when selecting a club for your second shot. Although it may appear flat, the green has many subtle breaks.
| Blue | 380 |
| White | 368 |
| Silver | 303 |
| Yellow | 299 |
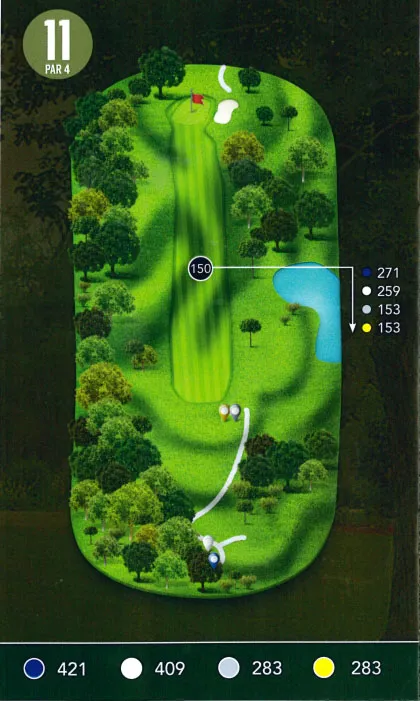
Pro Tip: Avoid the trees on the right side and you will have a good look at an uphill second shot. A bunker on the right side can grab your golf ball and create a difficult shot to the green that features a cumbersome false front.
| Blue | 421 |
| White | 409 |
| Silver | 283 |
| Yellow | 283 |
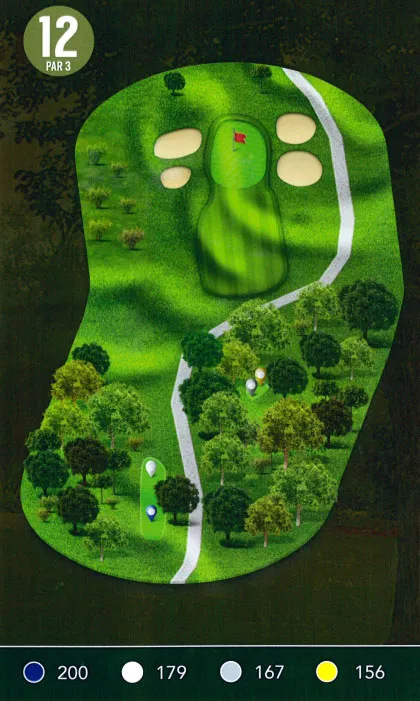
Pro Tip: Possibly the toughest par 3 on the course, the 12th hole forces you to hit your tee shot through a chute to a green that is heavily protected by bunkers on each side. The green slopes severely from back to front making par a very good score.
| Blue | 200 |
| White | 179 |
| Silver | 167 |
| Yellow | 156 |
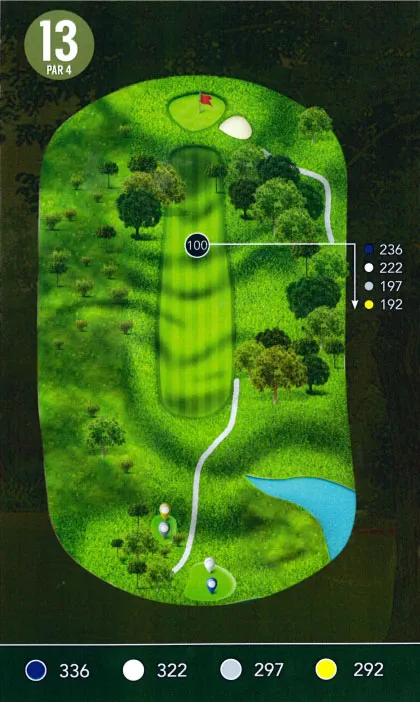
Pro Tip: The longer the club, the riskier the tee shot on the short par 4 13th. Near the green, the trees narrow making a driver a tough club choice to justify. The green is elevated and may require an extra club. Another back-to-front slope makes this one of the toughest greens on the golf course.
| Blue | 336 |
| White | 322 |
| Silver | 297 |
| Yellow | 292 |
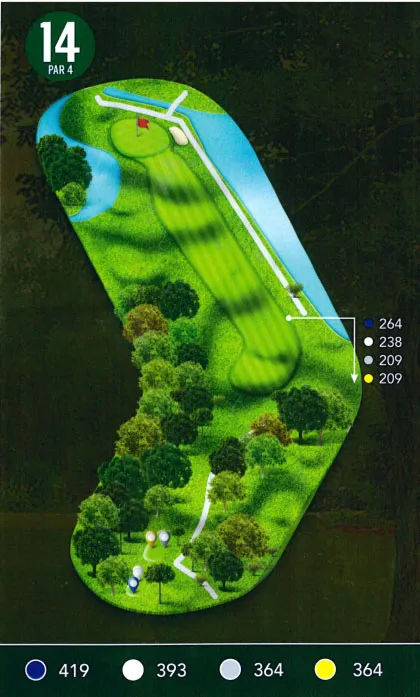
Pro Tip: This hole has the potential to make or break a round. The tee shot forces you through a narrow chute, but don’t go too far because the penalty area jumps out near the fairway. The sharp dogleg makes the hole play longer than is carded. The false front should be taken into consideration when selecting a club to hit into this green, which is protected by water on either side.
| Blue | 419 |
| White | 393 |
| Silver | 364 |
| Yellow | 364 |
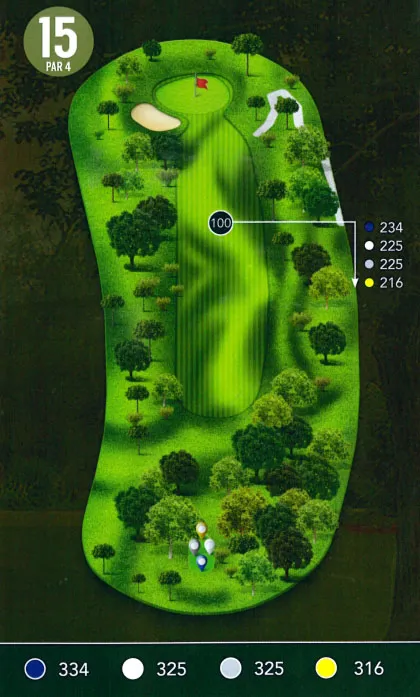
Pro Tip: After shooting through the trees on the tee shot, the fairway opens up and creates a good opportunity have a short club in hand for the second shot. The green slopes severely toward the false front which can carry golf balls to the base of the hill.
| Blue | 334 |
| White | 325 |
| Silver | 325 |
| Yellow | 316 |
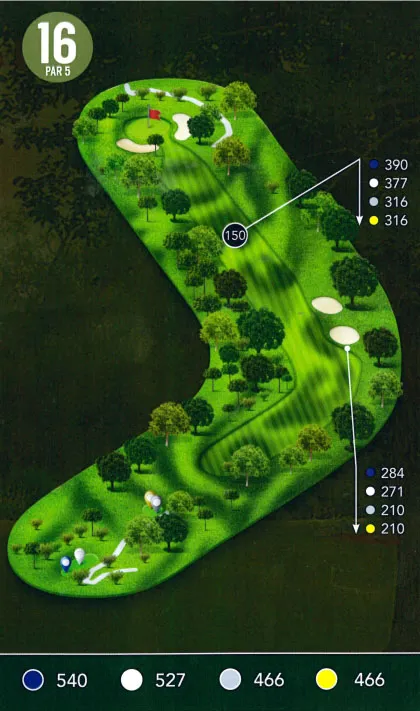
Pro Tip: Longer hitters can consider carrying the trees on this dogleg left par 5. There are bunkers through the fairway over the trees which are not visible from the tee. Bunkers protect the green on both sides. The native grass past the green can cause an immediate penalty.
| Blue | 540 |
| White | 527 |
| Silver | 466 |
| Yellow | 466 |
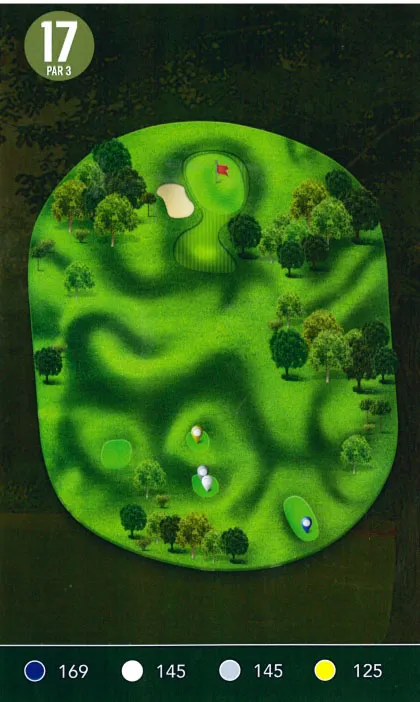
Pro Tip: The final par 3 on the course is a tough one. Avoid the green-side bunker on the left and leave the ball below the hole on this green. Its slippery slope can make for a quick 3-putt.
| Blue | 169 |
| White | 145 |
| Silver | 145 |
| Yellow | 125 |
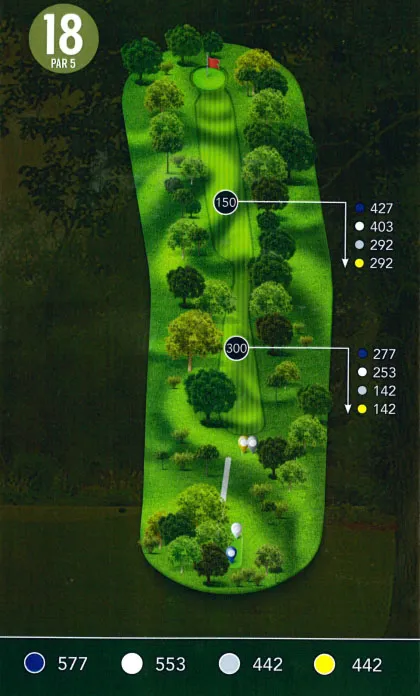
Pro Tip: One of only 3 holes that does not have a bunker, the par 5 finishing hole is the longest on the golf course, potentially playing over 570 yards. The fairway narrows in the landing zone for the tee shot, leaving you just short of a large hill. Play your second shot up to the left as the fairway sneaks back down to the right and could leave an awkward stance for the third shot. Another false front makes this green tricky as you wrap up your round.
| Blue | 577 |
| White | 553 |
| Silver | 442 |
| Yellow | 442 |